
mac/linux/windowsをできるだけ手間なく新しいソフトウェア状態で維持したい。
地味に入力せずに、一発で終わるようにできるのが理想。
mac/linuxで改善継続中やけど、macでbrew使うようにもなったので自分なりのまとめ。
brewでmacを維持
macは緊急じゃない場合でも、なんとなく月初めにシステムアップデート出てるような気がする。brewでパッケージ管理してて、こっちは不定期。
システムアップデートもコマンドラインあるんかもしれんけど、目で見て確認しながら更新したいから自動化はせず。
今回はbrewでパッケージ管理してるとこの話。
brewって何やねん。
たとえながら解説しておられる方がおられた。
作者さんありがとう。
なるほど、ビールを醸造することにたとえてるってことか。
Formulaはビルドのレシピで、Kegが樽でmakeの材料みたいな感じ。
こういうセンス好き。
南紀白浜のナギサビール飲みたくなってまう。
細かい使い方はこちらの解説を参考にさせてもらった。
作者さんありがとう。

brewでインストール
たとえばnmapをmacに入れたいとき。
$ brew install nmap
入れたらこんな感じ。
ジョッキが見えてカワイイ。
絵文字入ってるけど、webページで化けずに表示できるんかなぁ。
nari@gvisMac13 script % brew install nmap
==> Fetching nmap
==> Downloading https://ghcr.io/v2/homebrew/core/nmap/manifests/7.93
Already downloaded: /Users/nari/Library/Caches/Homebrew/downloads/edbc1a48185552df54d127166b7b3ee2aafeccf6fc4a05172f20de560cda64f8--nmap-7.93.bottle_manifest.json
==> Downloading https://ghcr.io/v2/homebrew/core/nmap/blobs/sha256:ffa5863f860997861ee935efb30c26f57
Already downloaded: /Users/nari/Library/Caches/Homebrew/downloads/5f8a56cbeeac537d883d0dd6482f216611d008aa3a959a361717087f131cd212--nmap--7.93.ventura.bottle.tar.gz
==> Pouring nmap--7.93.ventura.bottle.tar.gz
🍺  /usr/local/Cellar/nmap/7.93: 826 files, 26.5MB
==> Running `brew cleanup nmap`...
Disable this behaviour by setting HOMEBREW_NO_INSTALL_CLEANUP.
Hide these hints with HOMEBREW_NO_ENV_HINTS (see `man brew`).
nari@gvisMac13 script % which nmap
/usr/local/bin/nmap
nari@gvisMac13 script %
linuxと違って、sudoせずにインストールができるのは管理ユーザに指定してるからかも。
入れたパッケージの一覧を見たいとき。
$ brew list
こんな感じで出力される。
依存性は処理してくれるから、自分でインストール指示してないものも入る。
nari@gvisMac13 script % brew list
==> Formulae
ca-certificates	liblinear	mpdecimal	pcre		tree
gettext		libssh2		nkf		python@3.11	whois
glances		libunistring	nmap		readline	xz
libidn2		lua@5.3		openssl@1.1	sqlite

nari@gvisMac13 script %
brewで更新
たくさん打たずに済むようスクリプト化。
brew呼び出しスクリプト
パスの通ったフォルダに入れておいて実行する内容はこんな感じ。
#!/bin/sh
## -------------------------------------------------------------------------
## Script Name  : MacBackup.sh
##  Created by  : T.Naritomi
##          on  : 2023.02.03
##  Updated by  :
##          on  :
##  Parameters  :
##  Return Code : 0=Normal End
##     Comments :
## -------------------------------------------------------------------------

## ---detail----------------------------------------------------------------

echo "######## GVIS brew ########" `date +%F_%T`
echo "########  doctor   ########"
brew doctor
echo "########  update   ########"
brew update
echo "########  upgrade  ########"
brew upgrade
echo "########  cleanup  ########"
brew cleanup
echo "######## GVIS end  ########" `date +%F_%T`

exit
動かすとこんな感じ。
nari@gvisMac13 script % sh MacBrewUpdate.sh
######## GVIS brew ######## 2023-02-22_06:48:14
########  doctor   ########
==> Downloading https://formulae.brew.sh/api/formula.json

Your system is ready to brew.
########  update   ########
Already up-to-date.
########  upgrade  ########
########  cleanup  ########
######## GVIS end  ######## 2023-02-22_06:48:29
nari@gvisMac13 script %
エラーが出たら、個別対処してる。
見つけたらときどき追加するかな。
エラー1つめ)
########  doctor   ########
==> Downloading https://formulae.brew.sh/api/formula.json
######################################################################## 100.0%
Please note that these warnings are just used to help the Homebrew maintainers
with debugging if you file an issue. If everything you use Homebrew for is
working fine: please don't worry or file an issue; just ignore this. Thanks!

Warning: You have unlinked kegs in your Cellar.
Leaving kegs unlinked can lead to build-trouble and cause formulae that depend on
those kegs to fail to run properly once built. Run `brew link` on these:
  python@3.11
書いてあるとおりに対処する。
ここでは、python@3.11のlinkができてへんって言うてる。
--overwriteつけて上書きさせる。dry-runで試してから問題なさそうなら実行する。
nari@gvisMac13 script % brew link --overwrite --dry-run python@3.11
Would remove:
/usr/local/bin/2to3 -> /Library/Frameworks/Python.framework/Versions/3.10/bin/2to3
/usr/local/bin/idle3 -> /Library/Frameworks/Python.framework/Versions/3.10/bin/idle3
/usr/local/bin/pydoc3 -> /Library/Frameworks/Python.framework/Versions/3.10/bin/pydoc3
/usr/local/bin/python3 -> /Library/Frameworks/Python.framework/Versions/3.10/bin/python3
/usr/local/bin/python3-config -> /Library/Frameworks/Python.framework/Versions/3.10/bin/python3-config
nari@gvisMac13 script % brew link --overwrite python@3.11
Linking /usr/local/Cellar/python@3.11/3.11.2_1... 25 symlinks created.
nari@gvisMac13 script %
apt/yum/dnfでlinuxを維持
linuxの更新配信は不定期かなぁ。google cloudのモジュールは毎日更新してるときもあるように見えるけど、dockerとかsambaは月に1回ぐらいか。
aptはubuntuの親ホストとdockerのrdpコンテナで使用。
yum/dnfは昔にcentos動かしてたときに使ってたけど、もうdockerコンテナでしか動かしてない。
aptでインストール
たとえばnmapをutuntuに入れたいとき。
# apt install nmap
入れたらこんな感じ。
# apt install nmap
パッケージリストを読み込んでいます... 完了
依存関係ツリーを作成しています... 完了
状態情報を読み取っています... 完了
以下の追加パッケージがインストールされます:
  libblas3 liblinear4 liblua5.3-0 libpcap0.8 lua-lpeg nmap-common
提案パッケージ:
  liblinear-tools liblinear-dev ncat ndiff zenmap
以下のパッケージが新たにインストールされます:
  libblas3 liblinear4 liblua5.3-0 libpcap0.8 lua-lpeg nmap nmap-common
アップグレード: 0 個、新規インストール: 7 個、 削除: 0 個、保留: 2 個。
6,258 kB のアーカイブを取得する必要があります。
この操作後に追加で 27.2 MB のディスク容量が消費されます。
続行しますか? [Y/n]
取得:1 http://archive.ubuntu.com/ubuntu jammy/main amd64 libpcap0.8 amd64 1.10.1-4build1 [145 kB]
取得:2 http://archive.ubuntu.com/ubuntu jammy/main amd64 libblas3 amd64 3.10.0-2ubuntu1 [228 kB]
取得:3 http://archive.ubuntu.com/ubuntu jammy/universe amd64 liblinear4 amd64 2.3.0+dfsg-5 [41.4 kB]
取得:4 http://archive.ubuntu.com/ubuntu jammy/main amd64 liblua5.3-0 amd64 5.3.6-1build1 [140 kB]
取得:5 http://archive.ubuntu.com/ubuntu jammy/universe amd64 lua-lpeg amd64 1.0.2-1 [31.4 kB]
取得:6 http://archive.ubuntu.com/ubuntu jammy/universe amd64 nmap-common all 7.91+dfsg1+really7.80+dfsg1-2build1 [3,940 kB]
取得:7 http://archive.ubuntu.com/ubuntu jammy/universe amd64 nmap amd64 7.91+dfsg1+really7.80+dfsg1-2build1 [1,731 kB]
6,258 kB を 2秒 で取得しました (2,819 kB/s)
debconf: apt-utilsがインストールされていないため、パッケージの設定を遅らせます。
以前に未選択のパッケージ libpcap0.8:amd64 を選択しています。
(データベースを読み込んでいます ... 現在 91917 個のファイルとディレクトリがイン
ストールされています。)
.../0-libpcap0.8_1.10.1-4build1_amd64.deb を展開する準備をしています ...
libpcap0.8:amd64 (1.10.1-4build1) を展開しています...
以前に未選択のパッケージ libblas3:amd64 を選択しています。
.../1-libblas3_3.10.0-2ubuntu1_amd64.deb を展開する準備をしています ...
libblas3:amd64 (3.10.0-2ubuntu1) を展開しています...
以前に未選択のパッケージ liblinear4:amd64 を選択しています。
.../2-liblinear4_2.3.0+dfsg-5_amd64.deb を展開する準備をしています ...
liblinear4:amd64 (2.3.0+dfsg-5) を展開しています...
以前に未選択のパッケージ liblua5.3-0:amd64 を選択しています。
.../3-liblua5.3-0_5.3.6-1build1_amd64.deb を展開する準備をしています ...
liblua5.3-0:amd64 (5.3.6-1build1) を展開しています...
以前に未選択のパッケージ lua-lpeg:amd64 を選択しています。
.../4-lua-lpeg_1.0.2-1_amd64.deb を展開する準備をしています ...
lua-lpeg:amd64 (1.0.2-1) を展開しています...
以前に未選択のパッケージ nmap-common を選択しています。
.../5-nmap-common_7.91+dfsg1+really7.80+dfsg1-2build1_all.deb を展開する準備をし
ています ...
nmap-common (7.91+dfsg1+really7.80+dfsg1-2build1) を展開しています...
以前に未選択のパッケージ nmap を選択しています。
.../6-nmap_7.91+dfsg1+really7.80+dfsg1-2build1_amd64.deb を展開する準備をしてい
ます ...
nmap (7.91+dfsg1+really7.80+dfsg1-2build1) を展開しています...
lua-lpeg:amd64 (1.0.2-1) を設定しています ...
libblas3:amd64 (3.10.0-2ubuntu1) を設定しています ...
update-alternatives: /usr/lib/x86_64-linux-gnu/libblas.so.3 (libblas.so.3-x86_64
-linux-gnu) を提供するために自動モードで /usr/lib/x86_64-linux-gnu/blas/libblas.
so.3 を使います
libpcap0.8:amd64 (1.10.1-4build1) を設定しています ...
nmap-common (7.91+dfsg1+really7.80+dfsg1-2build1) を設定しています ...
liblua5.3-0:amd64 (5.3.6-1build1) を設定しています ...
liblinear4:amd64 (2.3.0+dfsg-5) を設定しています ...
nmap (7.91+dfsg1+really7.80+dfsg1-2build1) を設定しています ...
man-db (2.10.2-1) のトリガを処理しています ...
libc-bin (2.35-0ubuntu3.1) のトリガを処理しています ...
#
入れたパッケージの一覧を見たいとき。
$ apt list
リストからnmap探してみる。リストするだけならsudoしなくても見れる。
$ apt list | grep nmap

WARNING: apt does not have a stable CLI interface. Use with caution in scripts.

libcoq-mathcomp-finmap/jammy 1.5.1-1 amd64
libnmap-parser-perl/jammy,jammy 1.37-1 all
librust-cpp-synmap-dev/jammy 0.3.0-1 amd64
nmap-common/jammy,jammy 7.91+dfsg1+really7.80+dfsg1-2build1 all
nmap/jammy 7.91+dfsg1+really7.80+dfsg1-2build1 amd64
nmapsi4/jammy 0.5~alpha2-3 amd64
python-libnmap-doc/jammy,jammy 0.7.2-1 all
python3-libnmap/jammy,jammy 0.7.2-1 all
python3-nmap/jammy,jammy 0.6.1-1.1 all
nari@nafslinux-ubu22:~$
aptで更新
こっちもたくさん打たずに済むようスクリプト化してる。
apt呼び出しスクリプト
パスの通ったフォルダに入れておいて実行する内容はこんな感じ。
#!/bin/sh
## -------------------------------------------------------------------------
## Script Name  : 810_aptUpdate.sh
##  Created by  : T.Naritomi
##          on  : 2021.11.14
##  Updated by  :
##          on  :
##  Parameters  :
##  Return Code : 0=Normal End
##     Comments :
## -------------------------------------------------------------------------

## ---detail----------------------------------------------------------------

apt autoremove
apt clean
apt update
apt upgrade
やってみたらこんな感じ。macと違ってsudoするかsuでrootになっとく必要がある。
# sh ./810_aptUpdate.sh
パッケージリストを読み込んでいます... 完了
依存関係ツリーを作成しています... 完了
状態情報を読み取っています... 完了
アップグレード: 0 個、新規インストール: 0 個、削除: 0 個、保留: 3 個。
ヒット:1 https://download.docker.com/linux/ubuntu jammy InRelease
取得:2 https://packages.cloud.google.com/apt cloud-sdk InRelease [6,361 B]
取得:3 https://packages.cloud.google.com/apt cloud-sdk/main amd64 Packages [397 kB]
取得:4 https://packages.cloud.google.com/apt cloud-sdk/main i386 Packages [261 kB]
取得:5 http://security.ubuntu.com/ubuntu jammy-security InRelease [110 kB]
ヒット:6 http://jp.archive.ubuntu.com/ubuntu jammy InRelease
取得:7 http://jp.archive.ubuntu.com/ubuntu jammy-updates InRelease [119 kB]
ヒット:8 https://ppa.launchpadcontent.net/alessandro-strada/ppa/ubuntu jammy InRelease
取得:9 http://jp.archive.ubuntu.com/ubuntu jammy-backports InRelease [107 kB]
取得:10 http://security.ubuntu.com/ubuntu jammy-security/main amd64 DEP-11 Metadata [41.5 kB]
取得:11 http://jp.archive.ubuntu.com/ubuntu jammy-updates/main amd64 Packages [898 kB]
取得:12 http://security.ubuntu.com/ubuntu jammy-security/universe amd64 Packages [678 kB]
取得:13 http://jp.archive.ubuntu.com/ubuntu jammy-updates/main amd64 DEP-11 Metadata [101 kB]
取得:14 http://jp.archive.ubuntu.com/ubuntu jammy-updates/universe amd64 Packages [853 kB]
取得:15 http://jp.archive.ubuntu.com/ubuntu jammy-updates/universe i386 Packages [586 kB]
取得:16 http://jp.archive.ubuntu.com/ubuntu jammy-updates/universe amd64 DEP-11 Metadata [267 kB]
取得:17 http://jp.archive.ubuntu.com/ubuntu jammy-updates/universe amd64 c-n-f Metadata [17.3 kB]
取得:18 http://jp.archive.ubuntu.com/ubuntu jammy-updates/multiverse amd64 DEP-11 Metadata [940 B]
取得:19 http://jp.archive.ubuntu.com/ubuntu jammy-backports/main amd64 DEP-11 Metadata [8,004 B]
取得:20 http://jp.archive.ubuntu.com/ubuntu jammy-backports/universe amd64 Packages [19.5 kB]
取得:21 http://security.ubuntu.com/ubuntu jammy-security/universe i386 Packages [500 kB]
取得:22 http://security.ubuntu.com/ubuntu jammy-security/universe amd64 DEP-11 Metadata [15.2 kB]
取得:23 http://jp.archive.ubuntu.com/ubuntu jammy-backports/universe i386 Packages [10.7 kB]
取得:24 http://jp.archive.ubuntu.com/ubuntu jammy-backports/universe Translation-en [13.9 kB]
取得:25 http://jp.archive.ubuntu.com/ubuntu jammy-backports/universe amd64 DEP-11 Metadata [12.4 kB]
取得:26 http://security.ubuntu.com/ubuntu jammy-security/universe amd64 c-n-f Metadata [13.1 kB]
取得:27 http://jp.archive.ubuntu.com/ubuntu jammy-backports/universe amd64 c-n-f Metadata [392 B]
5,036 kB を 3秒 で取得しました (1,486 kB/s)
パッケージリストを読み込んでいます... 完了
依存関係ツリーを作成しています... 完了
状態情報を読み取っています... 完了
アップグレードできるパッケージが 4 個あります。表示するには 'apt list --upgradable' を実行してください。
パッケージリストを読み込んでいます... 完了
依存関係ツリーを作成しています... 完了
状態情報を読み取っています... 完了
アップグレードパッケージを検出しています... 完了
以下のパッケージは保留されます:
  grub-efi-amd64-bin grub-efi-amd64-signed shim-signed
以下のパッケージはアップグレードされます:
  google-cloud-sdk
アップグレード: 1 個、新規インストール: 0 個、削除: 0 個、保留: 3 個。
157 MB のアーカイブを取得する必要があります。
この操作後に追加で 1,535 kB のディスク容量が消費されます。
続行しますか? [Y/n]
取得:1 https://packages.cloud.google.com/apt cloud-sdk/main amd64 google-cloud-sdk all 419.0.0-0 [157 MB]
157 MB を 6秒 で取得しました (28.3 MB/s)
(データベースを読み込んでいます ... 現在 226796 個のファイルとディレクトリがインストールされています。)
.../google-cloud-sdk_419.0.0-0_all.deb を展開する準備をしています ...
google-cloud-sdk (419.0.0-0) で (418.0.0-0 に) 上書き展開しています ............................]
google-cloud-sdk (419.0.0-0) を設定しています ..................................................]
man-db (2.10.2-1) のトリガを処理しています ...#################################.................]
#
エラーは出たことないけど、ときどきsamba/apache2とかでサービス再起動確認のメッセージが表示されたら停止してることがある。見たら「了解」を選んで続行してる。
 lqqqqu Daemons using outdated libraries tqqqqqk
 x                                             x
 x                                             x
 x Which services should be restarted?         x
 x                                             x
 x    [*] apache2.service                      x
 x    [*] chrony.service                       x
 x    [*] packagekit.service                   x
 x    [*] smbd.service                         x
 x    [*] systemd-resolved.service             x
 x    [*] udisks2.service                      x
 x                                             x
 x                                             x
 x          <了解>            <取消>            x
 x                                             x
 mqqqqqqqqqqqqqqqqqqqqqqqqqqqqqqqqqqqqqqqqqqqqqj
更新してるとときどき「保留」ってのが出てくる。
1ヶ月以上残ることもあるけど、放置して更新してたらそのうちなくなるみたい。
よほど保留の期間が長かったら、パッケージ指定してapt installしたらええ。
yum/dnfでインストール
yumはcentos5の頃から使ってたはず。
centos8とバイバイして主に使うlinuxではなくなったけど、sshして試せるdockerコンテナには残してalmalinux8/9をときどき使ってる。
yumはcentos8/redhat8からdnfに置き換えられた。
python2を使わず、python3に変わったからやったと思う。
どちらも同じように使えるのは、リンクが生きてるから。
実際にはdnf-3へのリンクになってて、結局同じことができる。
# ls -l /usr/bin/yum
lrwxrwxrwx 1 root root 5 11月 15 19:27 /usr/bin/yum -> dnf-3
# ls -l /usr/bin/dnf
lrwxrwxrwx 1 root root 5 11月 15 19:27 /usr/bin/dnf -> dnf-3
#
# which dnf-3
/usr/bin/dnf-3
# ls -l /usr/bin/dnf-3
-rwxr-xr-x 1 root root 2092 11月 15 19:27 /usr/bin/dnf-3
nmap入れてみる。
# dnf install nmap
Last metadata expiration check: 18:45:32 ago on 2023年02月23日 08時40分19秒.
Dependencies resolved.
====================================================================================================
 Package                Architecture       Version                      Repository             Size
====================================================================================================
Installing:
 nmap                   x86_64             3:7.91-10.el9                appstream             5.4 M
Installing dependencies:
 libibverbs             x86_64             41.0-3.el9                   baseos                373 k
 libpcap                x86_64             14:1.10.0-4.el9              baseos                172 k
 nmap-ncat              x86_64             3:7.91-10.el9                appstream             223 k

Transaction Summary
====================================================================================================
Install  4 Packages

Total download size: 6.2 M
Installed size: 26 M
Is this ok [y/N]: y
Downloading Packages:
(1/4): nmap-ncat-7.91-10.el9.x86_64.rpm                             2.6 MB/s | 223 kB     00:00
(2/4): libibverbs-41.0-3.el9.x86_64.rpm                             3.5 MB/s | 373 kB     00:00
(3/4): libpcap-1.10.0-4.el9.x86_64.rpm                              5.0 MB/s | 172 kB     00:00
(4/4): nmap-7.91-10.el9.x86_64.rpm                                   16 MB/s | 5.4 MB     00:00
----------------------------------------------------------------------------------------------------
Total                                                               3.1 MB/s | 6.2 MB     00:01
Running transaction check
Transaction check succeeded.
Running transaction test
Transaction test succeeded.
Running transaction
  Preparing        :                                                                            1/1
  Installing       : libibverbs-41.0-3.el9.x86_64                                               1/4
warning: Unable to get systemd shutdown inhibition lock: Could not activate remote peer.

  Installing       : libpcap-14:1.10.0-4.el9.x86_64                                             2/4
  Installing       : nmap-ncat-3:7.91-10.el9.x86_64                                             3/4
  Running scriptlet: nmap-ncat-3:7.91-10.el9.x86_64                                             3/4
  Installing       : nmap-3:7.91-10.el9.x86_64                                                  4/4
  Running scriptlet: nmap-3:7.91-10.el9.x86_64                                                  4/4
  Verifying        : nmap-3:7.91-10.el9.x86_64                                                  1/4
  Verifying        : nmap-ncat-3:7.91-10.el9.x86_64                                             2/4
  Verifying        : libibverbs-41.0-3.el9.x86_64                                               3/4
  Verifying        : libpcap-14:1.10.0-4.el9.x86_64                                             4/4

Installed:
  libibverbs-41.0-3.el9.x86_64      libpcap-14:1.10.0-4.el9.x86_64    nmap-3:7.91-10.el9.x86_64
  nmap-ncat-3:7.91-10.el9.x86_64

Complete!
#
yum/dnfで更新
更新用のスクリプトはコレ。
yumって書いてcentos5あたりからずっと使ってたのを、centos8でdnfに書き換えた。
#!/bin/sh
## -------------------------------------------------------------------------
## Script Name  : 810_dnfUpdate.sh
##  Created by  : T.Naritomi
##          on  : 2010.09.14
##  Updated by  :
##          on  : 2019.11.17
##  Parameters  :
##  Return Code : 0=Normal End
##     Comments :
## -------------------------------------------------------------------------

## ---detail----------------------------------------------------------------

dnf clean all
dnf update
redhat8クローンのalmalinux9で動かしてみるとこんな感じ。
# sh ./810_dnfUpdate.sh
28 files removed
AlmaLinux 9 - AppStream                                             7.0 MB/s | 8.0 MB     00:01
AlmaLinux 9 - BaseOS                                                2.7 MB/s | 2.9 MB     00:01
AlmaLinux 9 - Extras                                                 20 kB/s |  17 kB     00:00
Dependencies resolved.
====================================================================================================
 Package                   Architecture     Version                       Repository           Size
====================================================================================================
Upgrading:
 webkit2gtk3-jsc           x86_64           2.36.7-1.el9_1.2              appstream           6.2 M

Transaction Summary
====================================================================================================
Upgrade  1 Package

Total download size: 6.2 M
Is this ok [y/N]: y
Downloading Packages:
webkit2gtk3-jsc-2.36.7-1.el9_1.2.x86_64.rpm                          18 MB/s | 6.2 MB     00:00
----------------------------------------------------------------------------------------------------
Total                                                               5.4 MB/s | 6.2 MB     00:01
Running transaction check
Transaction check succeeded.
Running transaction test
Transaction test succeeded.
Running transaction
  Preparing        :                                                                            1/1
  Upgrading        : webkit2gtk3-jsc-2.36.7-1.el9_1.2.x86_64                                    1/2
warning: Unable to get systemd shutdown inhibition lock: Could not activate remote peer.

  Cleanup          : webkit2gtk3-jsc-2.36.7-1.el9_1.1.x86_64                                    2/2
  Running scriptlet: webkit2gtk3-jsc-2.36.7-1.el9_1.1.x86_64                                    2/2
  Verifying        : webkit2gtk3-jsc-2.36.7-1.el9_1.2.x86_64                                    1/2
  Verifying        : webkit2gtk3-jsc-2.36.7-1.el9_1.1.x86_64                                    2/2

Upgraded:
  webkit2gtk3-jsc-2.36.7-1.el9_1.2.x86_64

Complete!
#
windows updateでwindowsを維持
セキュリティアップデート対処はけっこう回数があって、windowsは毎月2回目の水曜日の朝あたりに配信がある。
wsus使ってたら、社内の管理者がコンテンツを承認してくれるのを待つから、その少し後に使えるようになる。
アクティブ時間ってのがあって、設定しとかないと裏で処理が進んでOS再起動してまう。
windows updateはOSに対する処理やから、brewとかdnfとかと違ってアプリケーションやミドルウェアを管理するわけじゃない。
普通は「設定」の画面にあるwindows updateを選んだら、インターネット経由やwsus経由でシステム更新をしてくれる。
個人的には使わんけど、業務で管理するサーバならOSの定期再起動するときの直前に組み込んで自動化させて使ってることがある。
実際はタスクスケジューラに呼び出しバッチ処理、shutdown -f -s -t 60を順に呼び出すようにしておいて使う。
呼び出されるvbs
インターネット内に参考になるスクリプトを書いておられる方がおられる。
作者さんありがとう。
ほぼそのままお借りさせてもらってる。
スゴイなぁと思うのは、これがwindows2019とかのサーバでもwindows10/11でも、スンナリ動いてくれる。最近試したらwindows2022でもちゃんとwindows updateしてくれてた。
Option Explicit
Dim updateSession, updateSearcher, update, searchResult, downloader, updatesToDownload, updatesToInstall, installer, installationResult, InputKey, i

If Right((LCase(WScript.FullName)),11) <> "cscript.exe" then
 WScript.Echo "このスクリプトはCSCRIPT.EXEを使用して実行して下さい。" & _
  vbCRLF & "例: cscript WindowsUpdate.vbs"
 WScript.Quit(0)
End if

WScript.Echo "------------------------------"
WScript.Echo "Windows Update"
WScript.Echo "------------------------------"
WScript.Echo "更新プログラムを確認しています..."
Set updateSession = CreateObject("Microsoft.Update.Session")
Set updateSearcher = updateSession.CreateupdateSearcher()
Set searchResult = _
updateSearcher.Search("IsInstalled=0 and Type='Software'")
For i = 0 To searchResult.Updates.Count-1
 Set update = searchResult.Updates.Item(i)
 WScript.Echo i + 1 & vbTab & update.Title
Next

If searchResult.Updates.Count = 0 Then
 WScript.Echo "利用可能な更新プログラムはありません。Windowsは最新の状態です。"
 WScript.Quit(0)
Else
 WScript.Echo searchResult.Updates.Count & _
  " 個の更新プログラムを検出しました。ダウンロードを開始します。"
End If

WScript.StdOut.Write "ダウンロードの準備をしています..."
Set updatesToDownload = CreateObject("Microsoft.Update.UpdateColl")
For i = 0 to searchResult.Updates.Count-1
 Set update = searchResult.Updates.Item(i)
 WScript.StdOut.Write "."
 updatesToDownload.Add(update)
Next

WScript.Echo vbCRLF & "更新プログラムをダウンロードしています..."
Set downloader = updateSession.CreateUpdateDownloader()
downloader.Updates = updatesToDownload
downloader.Download()

WScript.Echo "以下の更新プログラムのダウンロードが完了しました。"
For i = 0 To searchResult.Updates.Count-1
 Set update = searchResult.Updates.Item(i)
 If update.IsDownloaded Then
  WScript.Echo i + 1 & vbTab & update.Title
 End If
Next

Set updatesToInstall = CreateObject("Microsoft.Update.UpdateColl")
WScript.StdOut.Write "インストールの準備をしています..."
For i = 0 To searchResult.Updates.Count-1
 set update = searchResult.Updates.Item(i)
 If update.IsDownloaded = true Then
  WScript.StdOut.Write "."
  updatesToInstall.Add(update)
 End If
Next

WScript.Echo vbCRLF & "更新プログラムをインストールしています..."
Set installer = updateSession.CreateUpdateInstaller()
installer.Updates = updatesToInstall
Set installationResult = installer.Install()

if installationResult.ResultCode = 2 then
 WScript.Echo "インストールは正常に完了しました。"
Else
 WScript.Echo "一部の更新プログラムをインストールできませんでした。"
End If
WScript.Echo "詳細:"
For i = 0 to updatesToInstall.Count - 1
 WScript.StdOut.Write i + 1 & vbTab & _
 updatesToInstall.Item(i).Title
 If installationResult.GetUpdateResult(i).ResultCode = 2 then
  WScript.Echo ":成功"
 Else
  WScript.Echo ":失敗"
 End If
Next
WScript.StdOut.Write "再起動の必要性: "
if installationResult.RebootRequired then
 WScript.Echo "必要"
 WScript.Echo "!重要な更新プログラムのインストールを完了するためコンピュータを再起動します。"
Else
 WScript.Echo "不要"
End if

'WScript.StdOut.Write vbCRLF & "続行するには何かキーを押してください:"
'InputKey = WScript.StdIn.Readline
if installationResult.RebootRequired then
 ' 再起動またはシャットダウンのためのコード(はじまり)
 Dim objWMIService, colOperatingSystems, ObjOperatingSystem
 Set objWMIService = GetObject("winmgmts:{impersonationLevel=impersonate,(Shutdown)}!\\.\root\cimv2")
 Set colOperatingSystems = objWMIService.ExecQuery("Select * from Win32_OperatingSystem")
 For Each objOperatingSystem in colOperatingSystems
  ObjOperatingSystem.Reboot() '再起動する場合
  'ObjOperatingSystem.Win32Shutdown(1)  'シャットダウンする場合
 Next
 ' 再起動またはシャットダウンのためのコード(おわり)
 WScript.Quit(-1)
Else
 WScript.Quit(0)
End If
呼び出しバッチ処理
こんな感じで書いとく。手動で動かすときはこのままで、タスクスケジューラで動かすときはpauseをコメントにする。
rem ##################################################
rem # Windows Update 呼び出し                        #
rem #                                                #
rem #                                                #
rem #                                                #
rem ##################################################

set PROCEDURE_VBS="c:\nari\sysupdate.vbs"
set PROCEDURE_LOG="c:\nari\sysupdate.log"

cscript %PROCEDURE_VBS% >> %PROCEDURE_LOG%

pause
exit
手動でwindows11で動かすとこんな感じ。
C:\nari>rem ##################################################
C:\nari>rem # Windows Update 呼び出し                        #
C:\nari>rem #                                                #
C:\nari>rem #                                                #
C:\nari>rem #                                                #
C:\nari>rem ##################################################
C:\nari>set PROCEDURE_VBS="c:\nari\sysupdate.vbs"
C:\nari>set PROCEDURE_LOG="c:\nari\sysupdate.log"
C:\nari>cscript "c:\nari\sysupdate.vbs"  1>>"c:\nari\sysupdate.log"

C:\nari>pause
続行するには何かキーを押してください . . .
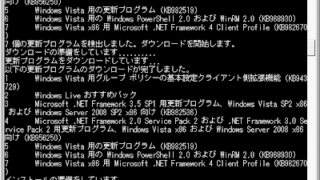
ログに取った標準出力の結果を見るとちゃんと動いてる。
Microsoft (R) Windows Script Host Version 5.812
Copyright (C) Microsoft Corporation. All rights reserved.

------------------------------
Windows Update
------------------------------
更新プログラムを確認しています...
利用可能な更新プログラムはありません。Windowsは最新の状態です。
ありゃりゃ、1つも対象がない。来月またやってみて貼りなおそか。
それでやりなおしてみた。
------------------------------
Windows Update
------------------------------
更新プログラムを確認しています...
1	2023-04 x64 ベース システム用 Windows 11 Version 22H2 の累積更新プログラム (KB5025239)
1 個の更新プログラムを検出しました。ダウンロードを開始します。
ダウンロードの準備をしています....
更新プログラムをダウンロードしています...
以下の更新プログラムのダウンロードが完了しました。
1	2023-04 x64 ベース システム用 Windows 11 Version 22H2 の累積更新プログラム (KB5025239)
インストールの準備をしています....
更新プログラムをインストールしています...
インストールは正常に完了しました。
詳細:
1	2023-04 x64 ベース システム用 Windows 11 Version 22H2 の累積更新プログラム (KB5025239):成功
再起動の必要性: 必要
!重要な更新プログラムのインストールを完了するためコンピュータを再起動します。
もしも適用したくないアップデートがあれば、コントロールパネルにインストールしたアップデートの一覧があるから、不要なものをアンインストールすればいい。
アンインストールできないものもあるんやろし、OS再起動せなアカンのやろけどね。
